Hello again people of the interwebs! I am pleased to bring you another exciting update to my wonderful project here! I don't have much of an introduction today, so let's just jump right in.
I tackled the first half of my main worry this afternoon; the cartridge slot. I was quite worried about how this could turn out, and quite frankly I'll still be worried about it until I get the other side hooked up and make sure that it actually works. But for now, I am quite pleased with how this side of the wiring turned out.
I spent a while debating what kind of wire to use for extending from the cartridge's solder points on the board. I ended up using an old IDE cable I had laying around. It turns out that, although IDE is only 40 pins, the cable had 80 wires in it! Score! Anyway, after about an hour or so of careful wire separating and stripping (my strippers wouldn't strip that small of a gauge wire) I came to this:

2 buses of 25 wires each, separated and ready to roll

Here is he first bus wired on completely. I ended up just breaking off all those annoying little brass pins on the bottom and running the wires up from the bottom to solder on. I didn't get a shot of the other bus wired up, but I'm sure you get the idea.
I picked up this nifty little surface-mount plug at a local electronics store and hooked it to the power supply. It takes the standard PC power cable, which is fantastic because I have a half-million of them. I was bit concerned, however, that because the 64 used a non-grounded plug and this connector uses a grounding one, it could lead to possible grounding issues. Since I'm no expert on proper grounding procedures, or A/C at all for that matter, I though it best to simply knock out the grounding pin and hook up the sides to properly polarize the plug. That way, if it's plugged into a grounded socket, it just won't do anything; just like the N64 did to start with.
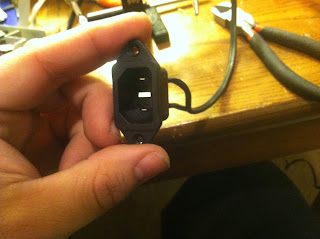
Here's a close up of the power supply wired up (yes I made sure it was polarized)

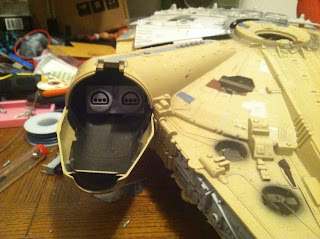
After I finished mucking about with power supplies, which if you've read my other blog you know that I loathe, I moved on to happier things like controller ports. I decided on a quite clever place for the controller ports to got at got to cutting.

The ports in the rough cut hole to check the fit. I did cut it a bit tall, but a little hot glue takes care of that nicely.

The ports wired up and glued in

This is how it will look closed up :) I had a bit of a nerd-gasm from how well this turned out

The board with all that stuff attached. The only thing left to wire to it is the main power switch and the A/V port, but I have to decide where they are going first. You can see both buses coming up in this shot too. I am still debating how I want to handle the cartridge slot. I have a few ideas, but after how rough the cut was for the controller ports, I am either going to have to get more tools, or re-think my approach for it altogether. More on that when I figure it out; moving on.
Now, I had mentioned in my last post that I had a rather clever solution to using the on-board electronics of the toy with this project. I could't just hook power to it and it all just work because the processor for the f/x uses 4.5 volts and the 64 supplies 12 and 3.3 volts. I took some measurements and it turns out that the LED's are supplied 3.3 volts when it turns them on, so I hacked off their wiring and hooked them to controller port 4's power and ground, because who needs all 4 ports anyway and its an easy solder point lol.
I just had to test the LED circuit I made out so I jumpered the power wires and plugged her up and viola:

(It's so beautiful I wanna cry...)

My wonderful assistant-girlfriend Caytee helped me take this one (fear her lovely fingernails!) to show off th front lights. She also recommended that I show a video of this in action so here you go:
The sounds and "gun" LED's are running off the built in battery pack and original electronics and the rest of the LED's are powered by the 64.
That's all for now. I'll post more as I get more things done. As always, I hope you all enjoy this as much as I do and check back soon!
That's all for now. I'll post more as I get more things done. As always, I hope you all enjoy this as much as I do and check back soon!
No comments:
Post a Comment